| This page takes
you step-by-step through the process of configuring your Macintosh
computer with MacOS 8.5 or 8.6 to connect to NETPLEX dial-up.
No additional software is required
to complete this process.
Open your Harddisk, and in the Assistants
folder, double-click on Internet Setup Assistant.
You'll be asked if you would like to set up
your computer to connect to the Internet. Select Yes
to continue.

Now, you'll be asked if you already have signed
up for an Internet account.
Assuming you already have activated your account
with NETPLEX, select Yes to continue.

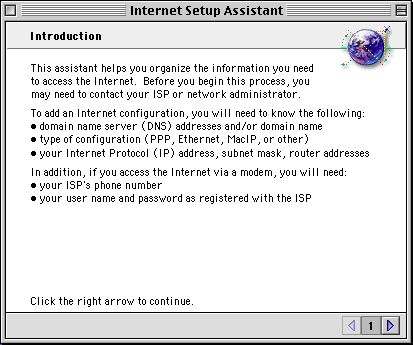
Next, you'll be introduced to the setup process.
Once you've read this screen, click the arrow pointing to
the right at the bottom of the window to go to the next
step.
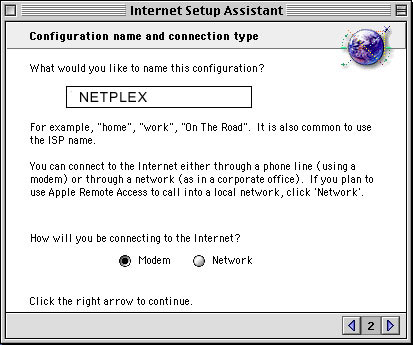
Next, you'll be asked what to name this configuration.
We'll just call it NETPLEX.
Then, select Modem for the method of
getting connected to us.
When finished, go to the next step.
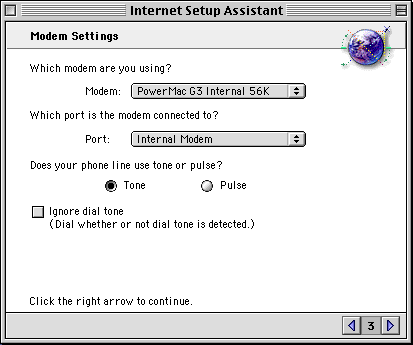
Now, you'll need to choose your modem from
the list. If you only have one modem installed, then the
default options for it are already selected as shown here.
Unless you live in an area where touch-tone
service is not available on your telephone line, you should
leave Tone selected below. It's a rare occurrence
you would need to use pulse-dialing.
Note: If there is no modem listed, you'll
need to either contact Apple (if your computer came with
a modem), or the manufacturer of your modem (if you bought
it separately), since we're unable to provide support for
hardware issues.
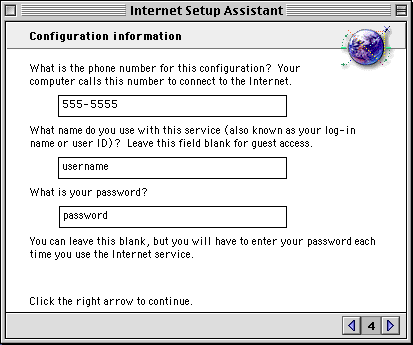
This is where you'll need to put in the number
to your local dial-in
number to our service. You should already know what
this is.
If you haven't found a dial-in number yet,
see our dial-in
list, and double-check with your telephone company to
see which one(s) would be considered a "local call". Only
the phone company can verify this, because they are the
ones who charge you for the calls you make. This way, you
can be sure you're not incurring extremely expensive charges
for being dialed up to our service.
Also, enter in your username and password,
as selected (or assigned to you) to sign onto our service.
Make sure that it is spelled correctly, and that you use
the lower case letters, so make sure the Caps Lock light
is turned off on your keyboard.
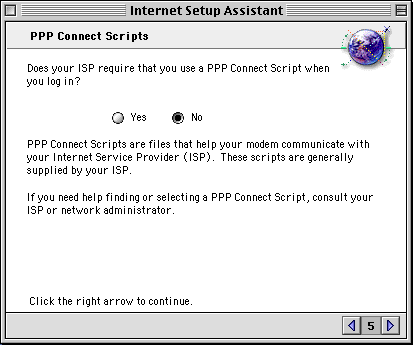
You'll now be asked if you need to use a PPP
script to sign on. The answer to this is No, so
please select that and go onto the next step.
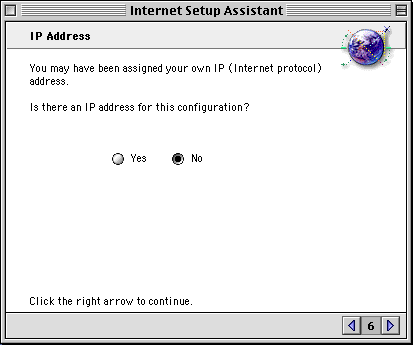
Now you'll be asked if there is a specific
IP address to use. On all of our standard dial-up accounts,
a different IP address is assigned to your computer every
time you sign on, and therefore you should NOT specify one.
Select No and go to the next step.
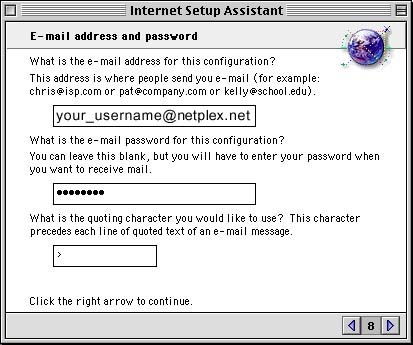
Now we'll enter some information about your
e-mail account. This will configure your computer to automatically
be able to send and receive e-mail.
You should already have been given your e-mail
address. Enter it in the first box.
Then, enter your password into the
next box.
Finally, you should leave the >
sign in the last box - this is the default setting and should
be left alone. It will be placed at the beginning of each
line in messages you automatically quote when replying,
letting the recipient of your e-mail know what portion you
wrote, and what portion is being quoted from previous correspondence.
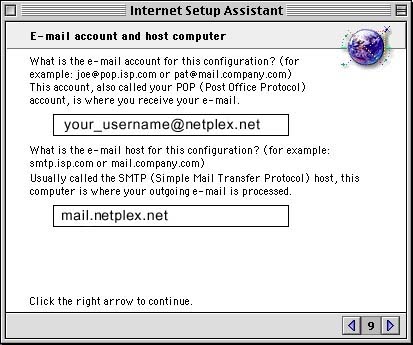
Now, we need to enter in the data about the
e-mail servers you use.
The first box is your e-mail account
name, and should be entered in the format shown below.
This information includes your mail account username @ the
actual name of the incoming mail server.
In the last box, put in your outgoing
mail server.
Now, you're asked if you're behind a proxy.
When you're connected to NETPLEX, you have a direct connection
to the Internet, and information is not passed to you by
proxy servers. Therefore, select No and go to the
next step.

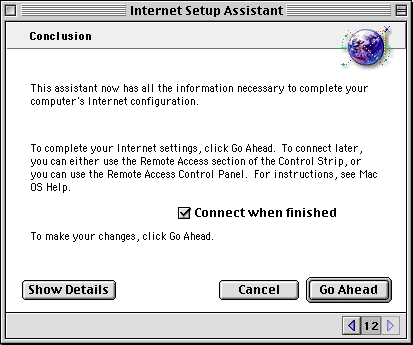
Now, you're ready to complete the process.
To save the information you've entered, click Go Ahead.
Also note, before you do that, if you don't
want to connect right away, uncheck the Connect when
finished box.
Getting Connected / Hanging Up
In this version of MacOS, you have what's called the
Control Strip on your screen. By default, there is
an option here for Remote Access (the system component used
to connect your computer to a remote network, such as the
Internet). It's the button with the little Mac, telephone
pole, and the timer as shown in this image:

You can just click the Remote Access button,
and select Connect to dial up. Once you're online,
you'll see that it begins timing the length of your session
to let you know how long you've been connected.

At this point, you can open any of your Internet
applications to get started, such as your Web browser, e-mail
client, chat programs, and whatnot.
When you're finished, just click this
button again, and select Disconnect to hang up the
modem and disconnect from NETPLEX.
|